Questions?
(800) 748-5647
(800) 748-5647
(800) 748-5647
(800) 748-5647
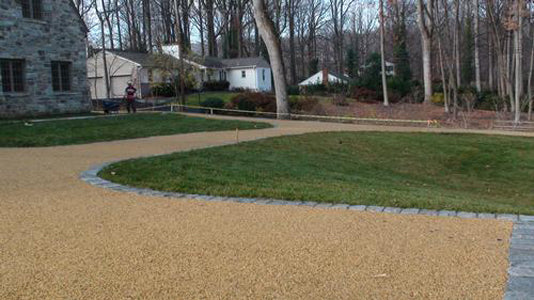
See the photos below for examples of Resin Driveways constructed using Gravel-Lok stone resin.


Taking on a new project can be a lot of fun and add something special to your home's landscape. Doing it the right way will decide its outcome. If you don't know why you would add stone glue to your latest gravel project, it's to keep the gravel from moving. If you have a gravel patio, the last thing you want is walking across it while kicking rocks around. When it rains, you will have a mess on your hands when the rocks start floating around or blow away. (Please note, these steps are general in nature and it is essential that you refer to the specific product instruction for the stone resin that you are utilizing for your project.) For this project, we will be creating a gravel patio and applying resin:
Leveling The Gravel To start with, you want to make sure the gravel is level. Take a broom and sweep across the gravel while using your feet to gently tamper down any high spots. The idea is to have it as level as you possibly can. Having a level surface will ensure you do not have any holes or dips which is especially important if your project is a gravel patio. With other projects, such as a flowerbed, it's not as important because you will not be walking across it but you still want it as level as possible. If you have an old broom you are ready to toss, use it. It would make a great tool for other gravel projects to create a smooth, flat surface. While smoothing out the surface, be gentle, you do not want rocks flying around or moving out of place. Also, while you are sweeping the gravel, remove any debris you find located in the gravel. You want to be sure you have a clean surface so when you apply the resin it will not have leaves, dead grass, or other debris left behind. Keep in mind, that if debris is left behind when the resin sets, these particles will remain there permanently for all to see. Also, when sweeping, you do not have to go crazy, just make sure it's level to your liking it does not have to be perfect. For a patio, you do want it as level as you can get it. Once this step is completed, you have to water down the gravel and let it dry. This is a very important step because if the gravel is dirty, the resin will not set properly.
Clean The Surface Of The Gravel When you buy the gravel whether at the Home Depot or Lowe's it will come in a bag. While inside the bag the gravel will be wet but once removed it will dry very quickly. You will notice a film of dust on the surface of the gravel so be sure and remove it. Take your hose with a showerhead, if you don't have one, buy one. Most showerheads have different settings, you want on the shower setting. Just take the hose and lightly spray it over the gravel so that it will be completely saturated. Using the shower setting allows the water to fan out and will not have strong pressure causing the gravel to move. You will notice this is like watering your grass. The only difference, you want the gravel soaked in a nice coating of water. This is also important for assuring the pebbles below the top layer are also well-watered. This is a relatively easy process and shouldn't take much time.
The Resin Once you have totally saturated the gravel patio area with water and rinsed the pebbles, you will be ready for the resin as soon as the gravel dries. The time it will take for the resin to dry will depend on your climate. If you live in a very hot area, it will dry pretty quickly. All in all, it will not take terribly long to dry. It's recommended you set a time frame of 24 to 48 hours for total completion. You should take your time to make sure you are applying the resin properly to give you an excellent finish. One note – if you have any pavers in the gravel patio area, You should mask them off. You can place pieces of cardboard on top of the pavers so you do not get resin on them. This is important if you plan on doing something different with the pavers. Otherwise, it really doesn't matter except you really shouldn't waste resin on pavers, it's a waste of time and money. Start working around the perimeter first and then work your way inward. We are using a compression sprayer with the nozzle on the spray setting similar to watering the pebbles. If you want the pavers covered, do that first then work your way along the edges then work your way inward. Be consistent in your strokes by going back and forth. Just use even strokes along the edges before working your way inward. Depending on the size of your gravel patio it will probably take an hour to apply. Our gravel patio is 10 x 10 which will take a gallon of resin. Just continually work it in as thoroughly as possible and then go over it at least one more time. You want to use up all the resin so you will know it's properly saturated and gotten down into the crevices and the layers down below. Especially while you are working on the perimeters, make sure you choose a day when it's not windy, you must have total and complete control over the sprayer. You do not want the resin flying all over the place and landing in areas of your grass where you do not want it. If you can, choose a sunny day with no wind. Make sure the forecast has no prediction of rain for at least the next 24 to 48 hours. It will take approximately 24 hours before the resin will completely cure and you will be able to place furniture on your new patio. In the meantime, the process of applying the resin and letting it cure will take a little more time so be patient. Once the resin has been completely applied, the gravel will look wet and that is the appearance it will maintain once everything has completely dried and solidified. We have removed all the coverings that were placed over the pavers. The reason we did this was that if some of the resin had gotten on the top of the covers and the tape, you would have to wait until it was completely dried the next day. Unfortunately, by then, the tape would become a permanent fixture on your pavers! You want to pull the covers and tape off as soon as you have finished putting down the resin. Because of the resin texture, it will be very easy to see where there might be some little bumps that are shiny due to the resin.. Just go through section by section and simply tap down any spots that are sticking up. This is the perfect time to look over everything and make sure all strokes are even. If you want to do some touch-ups, grab an old pair of shoes that won't matter if they end up with resin on them. If you have a trowel, you can go through and tap down any areas that seem a little too high. You might see some spaces that you didn't see before when applying the resin in the crevices or even around the outer perimeters. Touch-ups are common but this is a good time to find places you missed, if you don't feel enough resin was applied somewhere, or you have discovered some areas sticking up, now is the time to make corrections. All these added steps can be tedious but must be done. Once you have laid down the resin, sprayed the resin out, tapped everything down, make sure you pull off those protective covers for your pavers or other places you covered up so the resin will not get on them, you will be finished. Taking on a new project takes planning, having all the right tools, and a well-laid-out plan to achieve your finished product. Applying gravel along with a great resin for a longer life takes more time but will add a great touch to your outdoor project. We hope our tips and instructions will help you get the final results you are looking for. If you are new at taking on DIY projects, we hope this gives you the incentive to keep right on going! The best of luck!